Welcome to my easy label reading tutorial!
This is label reading so easy that you can do it while grocery shopping with your kids. And that’s saying something because I can barely do anything while grocery shopping with my kids, including buying groceries 😉 #amiright?
These 4 quick and easy steps can help you shop healthier when you’re buying packaged foods for your family.
Wait! A quick caveat: the best choices for your family may be different than the best choices for my family. In fact, my entire goal is to help you know exactly what those labels say so that you can make the best choices based on your standards, not mine.
And BTW, you’ll find that you won’t often have to use all 4 of these steps. Usually, by step #2 you will have deciphered whether this item is “healthy” or not and can make a purchasing decision accordingly.
The 4 Easy Steps to Read Food Labels
Here’s a video where I explain the system and show some detailed examples:
Prefer to read? Here’s a summary:
Step #1: Always flip over the package and read the back of the label
I know what you’re thinking: “Do I really have to read the back of the label?”. Yes! And here’s why.
The reason you need to read the back of the label is that you should think of the front of a label as an ad. Essentially, food companies get to use the front of their labels to highlight all the wonderful things about their food. The things they really want you to know. But it doesn’t show you the full picture of what’s actually in the food.
The back of the label is regulated by the government and it shows you exactly what’s in the food. Plus, everyone needs to list things the same way, so it helps you not only understand what’s in one item, but it helps you compare two items side-by-side equally.
This is why you’re always going to flip over the package and read the back of the label.
Step #2: Prioritize ingredient lists that are short and contain ingredients that you would cook with in your own kitchen
A short ingredient list means that they can’t pack too many things in there. But the second piece is that you want to look for things that you would actually use in your own kitchen.
I know that as a busy parent, you are unlikely to make your own crackers or bread or peanut butter. At least I was much more likely to do all of that before I had kids and had a little bit more time on my hands. (Extra time? What is that even??)
Now, I like to make sure that if I am buying a packaged food, that they have used ingredients that I would use if I were making it myself.
Let me give you an example of that: Peanut butter.
If you flip a lot of store-bought peanut butters over, you’re going to find things like peanuts and salt. Though you might also be surprised find high-fructose corn syrup and hydrogenated oils.
I don’t know about you, but I wouldn’t put those things in my food. And even if I wanted to it would be really hard for me to find them in a grocery store so that I could use them in my own kitchen.
So what I like to see when I flip over a peanut butter package is that it just contains peanuts and salt because, frankly, if I were to make peanut butter in my own kitchen, that’s all I’d use.
If you prioritize ingredient lists that are short and contain ingredients that you would cook with in your own kitchen that’s a great way to find products you can feel good about feeding your family.
Step #3: Pay the most attention to the first three to five ingredients
This one is for those of you parents who have kids running around your feet, climbing onto the cart, and stealing samples as you shop.
Ideally, you would read the whole ingredient list, but barring that, you want to pay attention the most to the first three to five ingredients. This is because ingredients on food labels are listed by weight.
That means the things show up highest on the ingredient lists are the things that this product contains the most of. So if you are time-crunched and you can only focus on a limited number of ingredients on that label, the first three to five is going to give you the most bang for your buck.
Tip #4: If you’re worried about sodium content, check that there are less mg of sodium per serving than calories per serving
Tip #4 is next level. Which means that some of you will never need to even use it. But for those of you who do need to keep your sodium in check, this can be a big help.
So why is fewer milligrams of sodium than calories per serving a useful guide?
If you’re an adult, you probably eat about 2000 calories per day. If you never eat any packaged food that has more milligrams per sodium than calories per serving than you would never eat more than 2,000 milligrams of sodium per day. Turns out, this is actually a pretty decent guide for most of us.
The same is true for your kids. They might not be eating 2000 calories, but if you follow this step they’ll never exceed the number of calories they’ve had in a day in milligrams of sodium.
As a side note: if you do serve something that is higher than you’d like (I certainly do), you can cut back in other places by just checking the label. For example, if I know we had something super salty later in the day I’ll aim for an even lower mg of sodium count than I might normally.
Packaged food is a major source of sodium content in most peoples’ diets, which is why I include this step as the one “deeper dive” into a specific nutrient. Turns out, you’re a lot less likely to oversalt your food than to eat too many salty snacks, right?
By checking that there is less mg of sodium per serving than calories per serving you can ensure that you aren’t getting unnecessary or unwanted sodium. There are so many things that you might not even realize you’re getting lots of sodium in!
Examples of Using this System to Read Food Labels to Pick the Healthiest Option
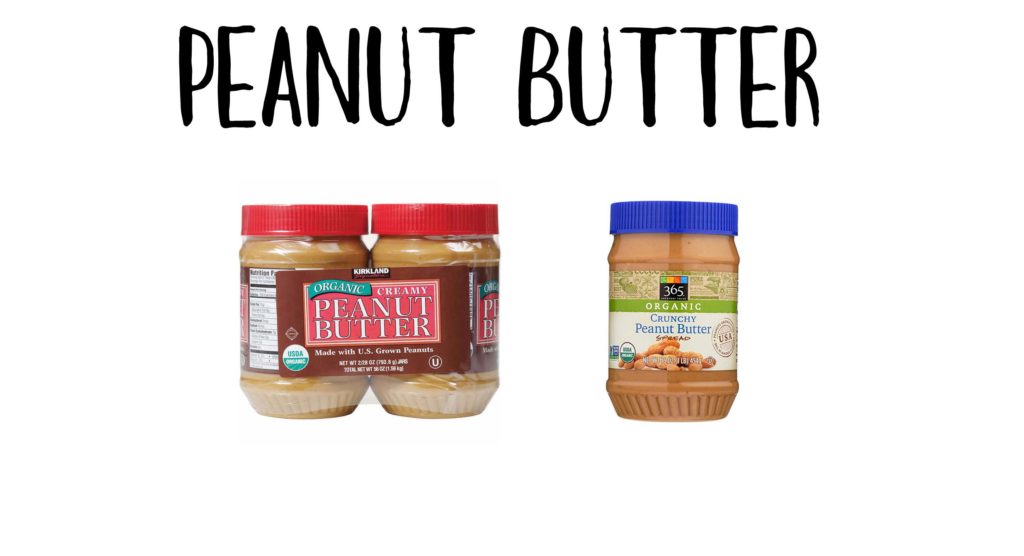
Here’s an example of Peanut Butter:
Let’s look at Kirkland Peanut Butter vs. 365 Peanut Butter (note that both are organic) by following the steps:
1. Flip over the package to read the back of the label

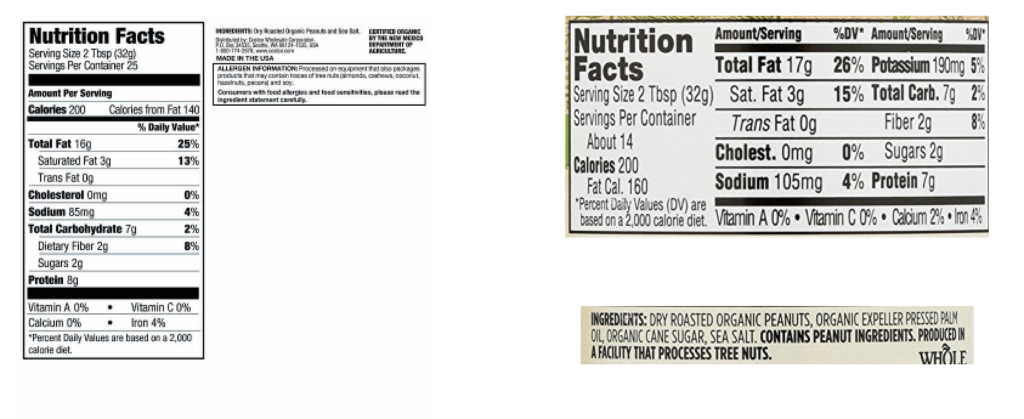
When you look at the back of the label you’ll notice that there is a major difference between these two peanut butter brands!
2. Prioritize ingredient lists that are short
- The Kirkland peanut butter is JUST peanuts and salt
- The 365 peanut butter contains palm oil and cane sugar as well
In this case, the Kirkland peanut butter would be the clear healthier choice. You probably don’t need to go any further than step #2, but let’s check the last to steps to practice how to read a food label 😀
3. Pay the most attention to the first 3-5 ingredients
In this case, that’s pretty easy because neither product has many ingredients in the first place!
The Kirkland peanut butter continues to be the healthier option, though, since it has 2 ingredients compared to 365’s 5.
4. Check that there are less Mg of sodium per serving than calories per serving
The Kirkland peanut butter has 200 calories/serving and 85 mg sodium/serving.
The 365 peanut butter has 200 calories/serving and 105 mg sodium/serving.
In this case, both options have less mg sodium than calories per serving. Great!
Given all of this data, I’d choose the Kirkland peanut butter. How about you?
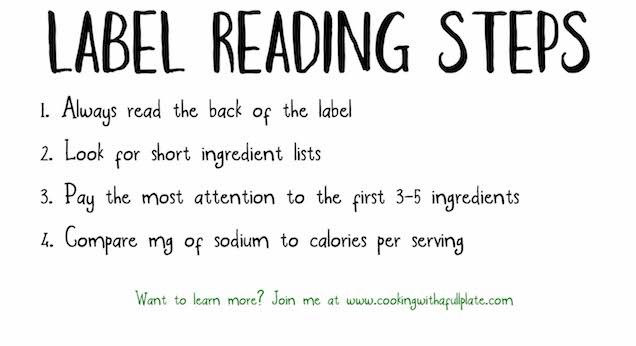
Want a visual reminder of this system? Here ya go:
This post contains affiliate links. As an Amazon Associate I earn from qualifying purchases.


